
纯代码布局的具体操作步骤
如果你想使用纯代码进行界面开发,请按以下 3 个步骤操作:
1. 删除 Storyboard 文件
在 Xcode 左侧导航栏中选中 Main.storyboard(或 Main),按 Delete 并选择 Move to Trash(移至废纸篓)。
2. 清除 Info.plist 中的 Main 引用
因为系统默认会尝试从 Main.storyboard 加载初始界面,需要删掉对应的键值:
- 打开
Info.plist(或在 Target 的 Info 选项卡下)。 - 展开 Application Scene Manifest -> Scene Configuration -> Application Session Role -> Item 0 (Default Configuration)。
- 找到 Storyboard Name 这一项(值为
Main),点击减号 将其删除。 - (若存在)在根节点下查找 Main storyboard file base name,如果存在也一并删除。
3. 在 SceneDelegate.swift 中配置根视图控制器
打开 SceneDelegate.swift,找到 scene(_:willConnectTo:options:) 方法,修改为如下代码:
func scene(_ scene: UIScene, willConnectTo session: UISceneSession, options connectionOptions: UIScene.ConnectionOptions) {
    // 1. 确保 scene 可以转换为 UIWindowScene
    guard let windowScene = (scene as? UIWindowScene) else { return }

    // 2. 使用 windowScene 初始化 UIWindow
    let window = UIWindow(windowScene: windowScene)

    // 3. 设置你的根视图控制器(例如 ViewController,或者带有 NavigationController 的视图)
    let mainVC = ViewController()
    let navVC = UINavigationController(rootViewController: mainVC)
    window.rootViewController = navVC

    // 4. 保存 window 并显示
    self.window = window
    window.makeKeyAndVisible()
}
完成上述配置后,重新运行项目,系统就会直接加载你用代码指定的 ViewController,不再依赖任何 Storyboard。
------
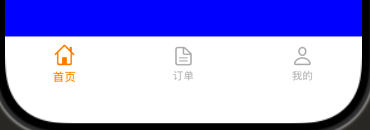
自定义Tabbar
删掉该删的;这里省略恢复NavigationController的手势操作了
    func scene(_ scene: UIScene, willConnectTo session: UISceneSession, options connectionOptions: UIScene.ConnectionOptions) {
        guard let windowScene = (scene as? UIWindowScene) else { return }
        let window = UIWindow(windowScene: windowScene)
        let homeTabbar = CustomTabbar()
        let nav = BaseNavController(rootViewController: homeTabbar)
        window.rootViewController = nav
        self.window = window
        window.makeKeyAndVisible()
    }
UIScene获取安全距离有些不同
现代 iOS 中,状态栏高度直接等同于主窗口的顶部安全区域(safeAreaInsets.top):
extension UIWindowScene {
    /// 顶部状态栏高度(刘海屏通常为 44~59pt,非刘海屏为 20pt)
    static var topSafeArea: CGFloat {
        let scene = UIApplication.shared.connectedScenes
            .first { $0.activationState == .foregroundActive } as? UIWindowScene
            ?? UIApplication.shared.connectedScenes.first as? UIWindowScene
        let window = scene?.windows.first(where: { $0.isKeyWindow }) ?? scene?.windows.first
        return window?.safeAreaInsets.top ?? 20.0
    }
}
诸如此类
extension UIWindowScene {
    static var current: UIWindowScene? {
        return UIApplication.shared.connectedScenes
            .first { $0.activationState == .foregroundActive } as? UIWindowScene ?? UIApplication.shared.connectedScenes.first as? UIWindowScene
    }
    static var bottomSafeArea: CGFloat {
        let firstScene = UIApplication.shared.connectedScenes
            .first { $0.activationState == .foregroundActive } as? UIWindowScene ?? UIApplication.shared.connectedScenes.first as? UIWindowScene
        let window = firstScene?.windows.first
        let bottom = window?.safeAreaInsets.bottom
        return bottom ?? 0
    }
//    底部
    static var statusHeight: CGFloat {
        let firstScene = UIApplication.shared.connectedScenes
            .first { $0.activationState == .foregroundActive } as? UIWindowScene ?? UIApplication.shared.connectedScenes.first as? UIWindowScene
        let window = firstScene?.windows.first
        let status = window?.safeAreaInsets.top
        return status ?? 20.0
    }
//    顶部
    static var currentBounds: CGRect {
        return current?.coordinateSpace.bounds ?? .zero
    }
//    窗口大小
}
-----
整体思路就是在for的时候把要更改的控件存起来,然后点击的时候再取出来切换样式。
let iconNames: [String] = ["house", "doc.text", "person"]
    let iconNamesSelected: [String] = ["house.fill", "doc.text.fill", "person.fill"]
    let textNames: [String] = ["首页", "订单", "我的"]
    private var iconBtn: [UIButton] = []
    private var iconImg: [UIImageView] = []
    private var iconLbl: [UILabel] = []
隐藏掉原来的TabBar,把TabBarController所控制的VC加进去
class CustomTabbar: UITabBarController {
    let iconNames: [String] = ["house", "doc.text", "person"]
    let iconNamesSelected: [String] = ["house.fill", "doc.text.fill", "person.fill"]
    let textNames: [String] = ["首页", "订单", "我的"]
    private var iconBtn: [UIButton] = []
    private var iconImg: [UIImageView] = []
    private var iconLbl: [UILabel] = []
    override func viewDidLoad() {
        super.viewDidLoad()
        self.tabBar.isHidden = true
        let homeVC = FirstVC()
        let ordersVC = SecondVC()
        let meVC = ThirdVC()
        self.viewControllers = [homeVC, ordersVC, meVC]
        setupUI()
    }
}
自定义的底部栏,要什么样式都可以自己写
 private func setupUI() {
        let backView = UIView(frame: .init(x: 0, y: SCREENHEIGHT - 64 - bottomSafeArea, width: SCREENWIDTH, height: bottomSafeArea + 64))
        backView.backgroundColor = .white
        let w = SCREENWIDTH / CGFloat(iconNames.count)
        for i in 0..<iconNames.count {
            let btn = UIButton(type: .custom)
            btn.tag = i
            btn.frame = .init(x: (CGFloat(i) * w), y: 0, width: w, height: 64)
//            btn.setTitle(textNames[i], for: .normal)
            let imgX = CGFloat((w - 24) / 2)
            let imgY = CGFloat((64 - 24 - 20) / 2)
            let btnImg = UIImageView(frame: .init(x: imgX, y: imgY, width: 24, height: 24))
            btnImg.image = UIImage(systemName: iconNames[i])
            btnImg.tintColor = .lightGray
            iconImg.append(btnImg)
            btn.addSubview(btnImg)

            let btnLbl = UILabel(frame: .init(x: imgX, y: imgY + 24, width: 24, height: 20))
            btnLbl.text = textNames[i]
            btnLbl.textColor = .lightGray
            btnLbl.font = .systemFont(ofSize: 12)
            btnLbl.textAlignment = .center
            iconLbl.append(btnLbl)
            btn.addSubview(btnLbl)
            btn.addSubview(btnImg)

            btn.backgroundColor = .clear
            btn.setTitleColor(.lightGray, for: .normal)
            btn.addTarget(self, action: #selector(tabButtonTapped(sender:)), for: .touchUpInside)
            iconBtn.append(btn)
            backView.addSubview(btn)
        }
        view.addSubview(backView)
        print(bottomSafeArea)
    }
核心:用tag把按钮绑定到系统的TabBarController.selectedIndex中;让系统组件帮你管理选项卡切换。然后再刷新一下UI
@objc private func tabButtonTapped(sender: UIButton) {
        let newIndex = sender.tag
        if self.selectedIndex == newIndex {
            return
        }
        let oldIndex = self.selectedIndex
        self.selectedIndex = newIndex
        iconImg[oldIndex].tintColor = .lightGray
        iconImg[newIndex].tintColor = .orange
        iconLbl[oldIndex].textColor = .lightGray
        iconLbl[newIndex].textColor = .orange

        UIView.animate(withDuration: 0.2) {
            self.iconBtn[oldIndex].transform = .identity
            self.iconBtn[newIndex].transform = CGAffineTransform(scaleX: 1.1, y: 1.1)
        }
    }
转载自 CSDN-专业IT技术社区
原文链接:https://blog.csdn.net/qq_27328363/article/details/167039113